8 Steps to Deciding Interior Paint Color

Selecting your paint colors can be very difficult. Here are 8 easy steps to help you make your choice!

1- DON’T PICK YOUR PAINT COLOR FIRST.

I know it seems natural to get the biggest things done first, but it is much easier to choose a paint color that goes with your furniture and decor than it is to choose decor to go with a paint color.

2-START WITH AN INSPIRATION.

Pinterest is a great place to start when deciding on paint colors.  Make a board for each room and start pinning rooms that catch your eye.  Once you have about 10 you’ll get a feel for what you are drawn to color and style wise.

Would you believe that the inspiration for the wall color that is in 90% of my home came from a Starbucks coffee mug?  Yep!

I love grey but  I didn’t want my house to feel cold (or like a prison cell) so I went for a greige that had just enough warmth that my slate grey furniture and accessories go with it, but would still feel warm.

brilliance painting inspiration

which leads me to my next point…

3- STICK WITH NEUTRALS.

Now I’m not saying avoid color all together.  Color is good, but you have to first decide where you want the attention in a room to go.  If your answer is the walls, then heck, go bold.  And if you go bold on the walls everything else in the room should be pretty neutral so that you don’t end up with too many things competing.  This is why bold color in a bathroom can work so well because most everything else in a bathroom is already neutral (white.) 

4-USE TESTERS.

Buy testers in a few colors/ shades and paint a large enough area on a few different walls so that you can see how the light hits it at different times of the day.  Try your best not to test your paint against white walls cause it will throw the color off.  If you have to, just do a larger test area to get a better feel.

Almost all of the brands now have testers available for a few bucks.  It is well worth spending the money to buy a few to test in your space before purchasing gallons of the color.  Plus the leftover samples are great for touch up and other small painting projects.

Leave the test areas up for about a week so that you can see what the color will look at different times of day and in different light.

*Tip: Instead of painting an entire (open concept) living space all one color, break it up by painting some rooms or accent walls a few shades lighter or darker on the same color strip.  This will add some depth to a space. (Also mentioned in tip 8.)

5- TEST YOUR PAINT COLORS AGAINST FURNITURE AND FABRICS.

Don’t only test your colors on the wall. Instead, paint a piece of poster board and hold it up against your sofa, table or other items that will be in the room to see if goes.  You don’t necessarily want to match, but you do want the undertones to go nicely.

6- PICK THE RIGHT SHEEN.

Any sheen in a paint will accent flaws, so if you are trying to mask flaws go with as little sheen as possible.

Here are some general guidelines for the different finish choices:

  • Flat (Matte): No shine at all. Perfect for for low traffic areas like living rooms and bedrooms, as well as ceilings.
  • Flat Enamel: Has almost no shine but is a bit easier to clean than flat paint. This is also perfect for low traffic areas but may be a better choice if you have kids or pets.
  • Eggshell Enamel: Has a tiny bit of shine and is a good choice for moderate traffic areas such as living rooms.  In my experience most scuffs can be wiped off of this surface with a damp cloth.
  • Satin Enamel: Has a bit more shine and works well in high traffic areas or areas that have moisture.  It is also super wipeable which is why it is perfect for kitchens and bathrooms.
  • Semi-Gloss Enamel: Shiny but not glass-like.  This is what you should use on cabinets and trim, or in really high moisture areas.
  • Hi-Gloss Enamel:  Shiny! This gives an almost glass-like finish and is perfect for high use surfaces (like a railing) or furniture.

7- UNDERSTAND UNDERTONES:

Use the darkest color on the strip to discover the true color.  This will save you from ending up with paint that is too pink, too blue, too yellow, etc.

8-HAVE A COLOR THEME THROUGHOUT YOUR HOME. (MORE ON THIS IN THE NEXT POST IN THE SERIES  )

I don’t mean you have to paint your entire house the same color, but especially in rooms that open into one another consider what each room will look like when standing in another.  If you are going to play it safe and go with one color, I would suggest that you at least go a few shades lighter or darker in one room or even on one focal wall.  It is a great way to add depth and interest to a space.

5 Easy Tips for Choosing Your Exterior Paint Palette

Because I live in an older neighborhood with no homeowners association or bylaws, there are no rules and regulations that dictate exterior paint colors. Most of the time, that's a very good thing. Recently, however, our neighbors painted their home a shade of green that ... well, let's just say it's gotten a lot of stares, and not the flattering kind. 

Unlike interior colors, exterior hues can affect the entire street — and that puts a lot of pressure on homeowners when it comes to choosing a palette. In addition, a number of factors come into play that you don't have to deal with on the inside of a house: landscaping, hardscaping, roofing and more. 

Follow these tips to choose a color scheme that works both for your style and for your home's surroundings.

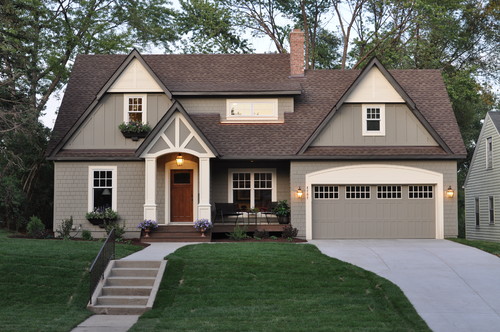
Plan around the elements that are hardest to change. Unless you're doing a complete renovation, surfaces such as roof shingles or tiles, stonework, pathways and driveways will remain in place. Take these into consideration as you select exterior colors. 

Look for undertones between them that might inform your palette. Are they warm (beige, khaki, brown and rust) or cool (gray, blue and black)? Consider paint colors that will tie these fixed elements together in a harmonious way.

Consider your home's architectural style and era.Whether you have a Queen Anne Victorian, a Craftsman bungalow or a midcentury modern ranch, your exterior paint scheme should feel appropriate to the style. Imagine a classic federal-style home painted burnt orange, or a New England saltbox in pale mint green. Jarring, right? 

Many paint manufacturers offer collections of historically accurate colors, which can be an excellent springboard for your palette, and you can also consult a professional who specializes in this area. You don't have to adhere strictly to historical guidelines unless codes for your home and neighborhood specify otherwise, but for the most pleasing effect, don't stray too far from them.

Think about the visual effect you want. Mull over your home's relationship to the street and the landscape. Does it sit back from the road or amid a cluster of large, towering trees? You might choose a slightly lighter or brighter color so that it stands out. Conversely, a darker hue can make it appear to recede.

Choose three or more different paint shades. Essentially, an exterior scheme has three major parts: field color, which dominates; accent color, which brings doors, shutters and other smaller areas to life; and trim color, used for window and door casings, roof edging, railings and other trimwork. 

Ideally, the trim color should contrast strongly with the field color. If your main hue is dark, consider classic white trim or another pale shade. A light field color can look stunning with darker trim — like eyeliner for your home, it produces a crisp, dramatic effect. Feel free to go bold with accent colors, but don't go overboard. A door painted bright red or lemon yellow lends just the right hit of punch. Extending that same shade to the shutters and gables ... not so much. 

Stuck for inspiration? Most major paint brands offer preselected color palettes that take the guesswork out of coordinating an exterior scheme. An architect or a color consultant also can help you come up with a combination that's unusual but still attractive.

Never rely on paint chips alone. Just like interior colors, exterior shades can vary significantly from the way they appear on the chip. And because painting an exterior is a bigger undertaking than simply painting a room, you'll want to get them right the first time. 

Buy a quart of paint and test it on an inconspicuous area of your home. Study it at various times of day and under different weather conditions. How does it change with the light? Road testing it is the only way to determine for sure if you'll be happy with it for years to come.

-Author: Lisa Federick via https://www.houzz.com/ideabooks/3317364/list/5-easy-tips-for-choosing-your-exterior-paint-palette

Mold...Now What?

Mold. The very word can put terror into the eyes of a homeowner. After all, mold in your home can make you and your family sick. If nothing else, it looks disgusting. But it can also weaken your walls, ceilings and floor. And if you try to sell a house known to have mold, you might as well put a sign on your front lawn that reads: "Not For Sale."

So if you think you have mold, and plenty houses do – a 2003 University of Arizona study found that 100 percent of homes have mold (albeit not necessarily the dangerous kind) – what should you do?

Test for mold. That's probably the last thing you or any homeowner wants to hear because mold testing can be expensive, and there are plenty of horror stories out there. Several years ago, Gayle Lynn Falkenthal, who owns a public relations consulting company in San Diego, had a "wicked case of mold" in her kitchen.

"I had no idea it was developing until I could smell it," Falkenthal says.

It turned out to be mold that had developed due to a slow plumbing leak, and by the time she could smell the mold, it was so bad, she ended up having to hire a flood restoration team to gut her kitchen, remove the mold and rebuild a new one during the Thanksgiving and Christmas holidays. The mold removal alone – not including the cost of rebuilding her kitchen – set her back $15,000.

"My house looked like a hazmat scene," Falkenthal says, adding that on the bright side, "That's one way to get a new kitchen."

If you're deeply suspicious, it'll probably be worth it to hire a mold inspection company. The average cost to test for mold – not to remove, just to test – is $834, according to HomeAdvisor.com. If that price makes you ill, you could buy a mold testing home kit, which generally runs anywhere from$10 to $50. That said, molding test kits have a reputation for being unreliable, so as the expression goes, let the buyer beware.

If you do have mold. Don't panic yet. This may not be a major problem. As noted, all homes have some mold. If it's a small area, generally less than 10 square feet, and not that this is a recommendation, but you may be able to do it yourself or hire a handyman to come in and clean it. Websites from RemoveMoldGuide.com to Good Housekeeping articles explain the process, which basically entails treating areas of mold with a mixture of 1 part chlorine bleach and 15 parts water while wearing goggles and making sure you're in a well-ventilated room.

But you may need to hire a professional to mitigate it. Lynn Munroe, who owns a public relations company in New City, New York, says that about 10 years ago, her youngest son, then 8 or 9 years old, had an unexplained stomach illness, and his asthma was getting worse. Munroe had taken him to numerous doctors, all of whom had no idea what was wrong.

It turned out the problem was with a dehumidifier in the basement. It was attached to the pipes behind the wall, to keep the basement dry. Unfortunately, the pipe apparently became disconnected from the drain pipe behind the wall, and for some time, had been dripping behind the wall.

"Next to where it was dripping was a cedar storage closet with my kids' old clothes that I was saving for my sister's kids," Munroe says. "I opened up that door one day and the inside of the closet was filled with black mold. The wall of that closet leaned up against my sons' playroom – and his TV where he spent countless hours with his brother playing video games. Air tests revealed a really bad mold problem not only in the closet but in the air."

Twenty-four hours later, Munroe says, "hazmat suits came and demolished my completely finished basement."

The very bad news: It set her back $40,000, including the costs of refinishing the basement. Munroe and her family also had to move into her sister's house for six weeks. The very good news: "My son's health condition improved immediately," she says.

Avoid scams. Mold removal scams are fairly common. For instance, Kentucky has recently had a rise in reported residential mold cases after a spate of spring and early summer thunderstorms and flooding; this summer, the state alerted its citizens to be vigilant for scam artists and price-gouging by mold removal businesses.

And, of course, being aware that price gouging is a possibility is troubling. It's pretty easy to stay away from a clearly shady operation, like hiring a guy who does business out of the trunk of his car. You'd almost have to be a mind reader or a mold expert to know if a reputable company might be price gouging.

Still, if you're going to hire a company to remove your mold, "always get two bids, so you can get different opinions," says Sabine Schoenberg, a Greenwich, Connecticut-based real estate agent who runs the home improvement website ThisNewHouse.com.

But she adds: "To some extent, I'm a little sympathetic that mold removal companies can't always give you a hard-and-fast estimate since they don't always know what type of problem you have until they take a closer look."

Stay vigilant. If you aren't aware of any toxic mold in your home, keep an occasional eye out for it. "A lot of keeping mold away comes down to maintenance," Schoenberg says. "Anywhere you may have dampness, there can be mold. So look in dark and damp places. And it isn't always in obvious places. Like your washing machine, the tray where you put your soap, open that up and let that dry out."

John Bodrozic, co-founder of HomeZada.com, a home management website, echoes that advice and says these simple maintenance tasks will usually dramatically reduce your chances of having a mold problem. Mainly, he advises:

  • Caulk around the water fixtures. That is, your kitchen and bathroom sink, or any sinks or showers in any rooms. "Leaks in and around showers, sinks and bathtubs are source of mold," he says.
  • Clean out the gutters. Well, at least you were going to get around to this sometime, anyway, right? Not only will you prevent things like flooding, it'll reduce your chance of mold. "Standing water in your gutters due to clogs can lead to water leaking into the eaves, and thus in exterior walls," Bodrozic says.
  • Caulk around your windows. On the outside, Bodrozic says. You don't want any leaking after a big rain.
  • Take care of any roof leaks. You'll notice if your roof is leaking into your bedroom, of course, but do you have an attic? Or a crawl space over your ceiling? "These leaks can go unnoticed for years, causing mold growth," he says.
  • Do you have a crawl space under the home? If you do, check under it, to make sure there's no water accumulating and standing there, Bodrozic says. Sure, it'll be gross, but water can lead to mold and structural problems, Bodrozic warns.

In other words, think of mold as a guest who knows it isn't welcome. So don't just hang out in the most popular areas of the house. Every once in awhile, be a good host and drop by the corners and crevices of your home that you normally wouldn't give a second thought about. Your mold is a visitor in your home – but a really shy one.